Introduction

If you are a corporate administrator or an IT staff, you may have confront a situation that you have to install and setup Windows XP on many computers which all computers have identical hardware configurations. What will you do? Go to each computer, sit and manually install Windows XP? If only a few computers, it’s OK to do that. It would takes few hours to complete that. But what if there are more than 10 computers or 100 computers waiting you to install and setup. That would be painful to do that way.

Prepare Source for Disk Duplication

In this post, I’ll show you how to create an Answer file for using when setup Windows after a computer is cloned. And run Sysprep tool to prepare a computer to be a sample computer (source disk) for cloning.


The Answer file should contains only general configuration not unique value on each computer. For instance, if you’re going to deploy the image to all computers in the same time zone, it is good to configure time zone in the answer file so that you don’t have to set time zone on each computer after cloned them. But if you’re going to deploy the image in different time zone, you should not configure time zone in the answer file.

Step-by-step

  1. Install Windows XP, update patches and setup the basic applications on the sample computer.
    Prepare Sample Computer
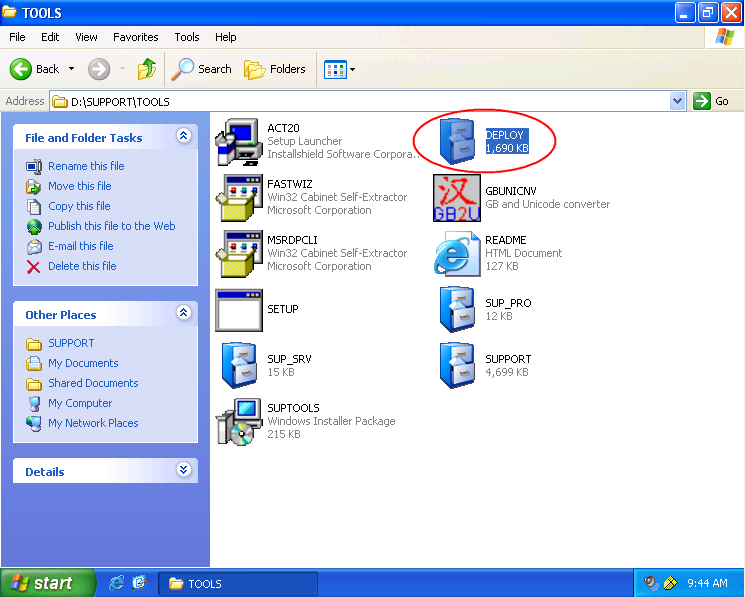
  2. Extract Sysprep tool. Insert the Windows XP CD. Navigate to “CD-Rom DriveSUPPORTTOOLS” and extract deploy.cab to C:Sysprep. If you don’t have Windows XP CD, you can download the Sysprep tool from Microsoft.
    Note: You have to use the Sysprep tool version according to Windows version. For example, you should not use Sysprep for Windows XP on Windows Server 2003.
    Extract Sysprep
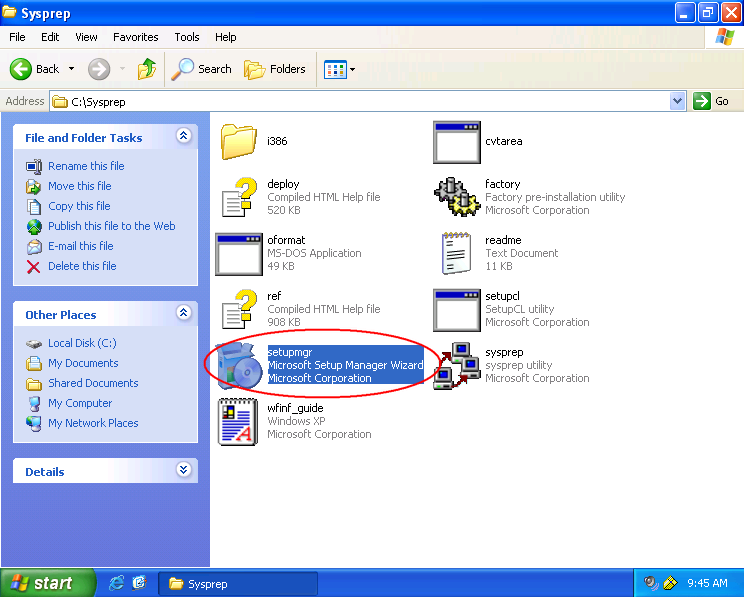
  3. Run Setup Manager to create an Answer file. Double-click on setupmgr.exe.
    Run Setup Manager
  4. On Welcome to Setup Manager,click Next.
    Welcome to Setup Manager
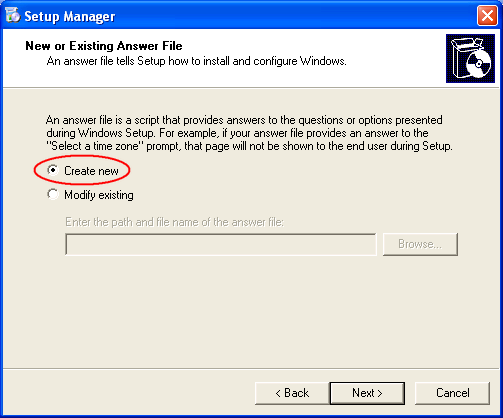
  5. On New or Existing Answer File, select Create new. Click Next.
    New Answer File
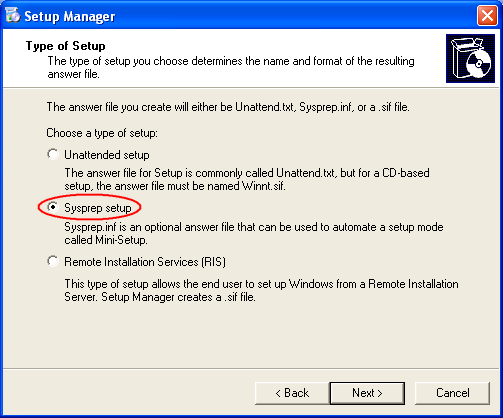
  6. On Type of Setup, select Sysprep setup. Click Next.
    Sysprep setup
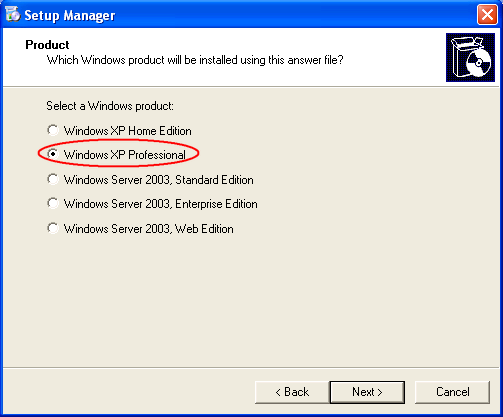
  7. On Product, select Windows XP Professional. Click Next.
    Select Windows XP Professional
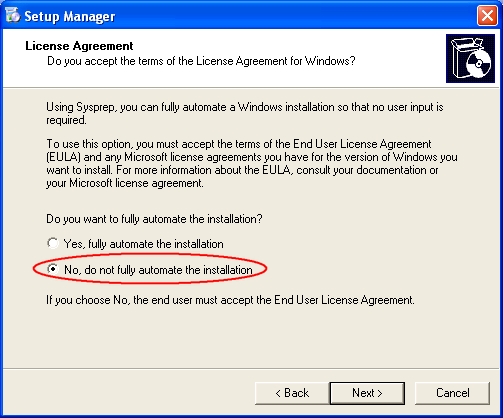
  8. On License Agreement, select No, do not fully automate the installation. Click Next.
    License Agreement
  9. Now you can configure the general configuration in your environment. I’ll show sample configuration.
    On Name and Organization, enter the Name and the Organization.
    Name and the Organization
  10. On Time Zone, select the time zone.
    Select Time Zone
  11. On Product Key, enter the Windows product key if you have Windows corporate key (one key can be installed on many computers). If you have an unique key on each computer, leave this empty.
    Enter Product Key
  12. On Computer Name, select Automatically generate computer name so that each computer after cloned and run sysprep, it’ll has unique computer name (Auto-generated name).
    Set Computer Name
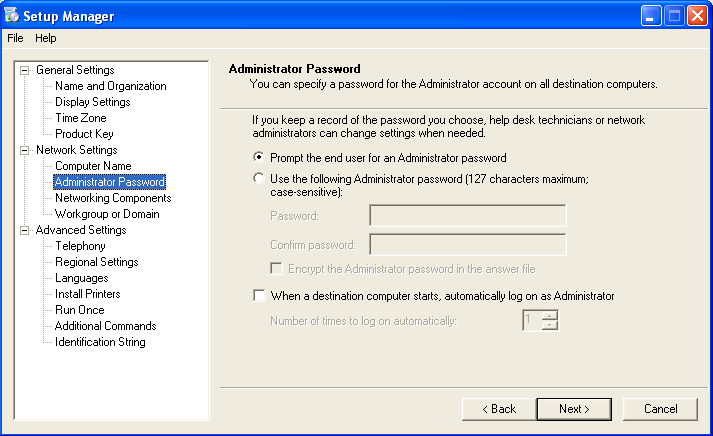
  13. On Administrator Password, leave as default.
    Administrator Password
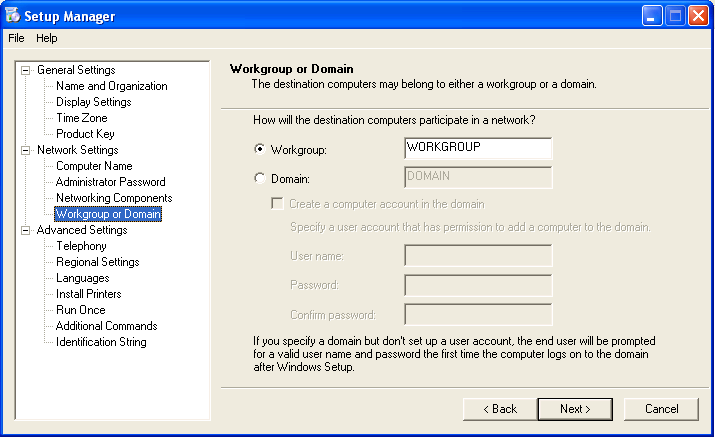
  14. On Workgroup or Domain, leave as default.
    Select Workgroup or Domain
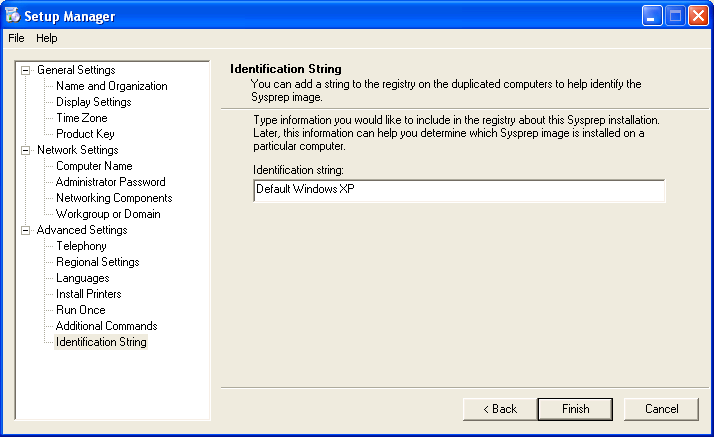
  15. On Identification String, give some name to identify this sysprep image. It’ll keep this information in the registry so you’ll know that this computer was cloned from which Sysprep image. Click Finish.
    Set Identification String
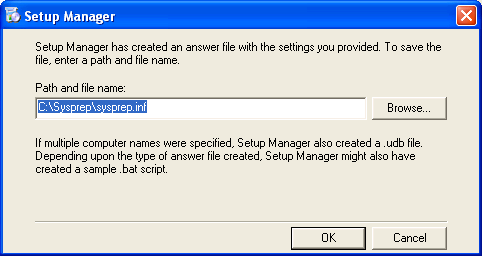
  16. Save the .inf file. This is the Answer file that you’ve configured. Save it in the same folder and click OK.
    Save Answer File
  17. After the Answer File has been saved, click Cancel to exit Setup Manager
    Exit Setup Manager
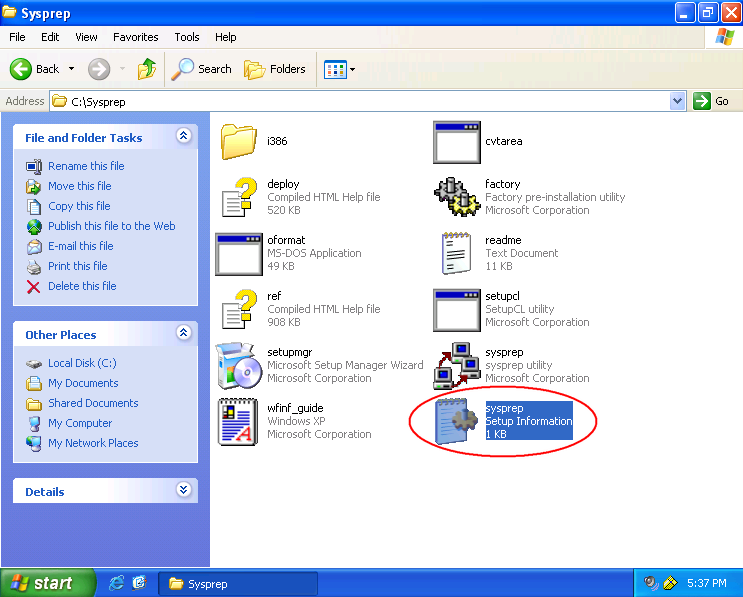
  18. You noticed the Sysprep’s Answer file has been created in Windows Explorer.
    Sysprep's Answer File
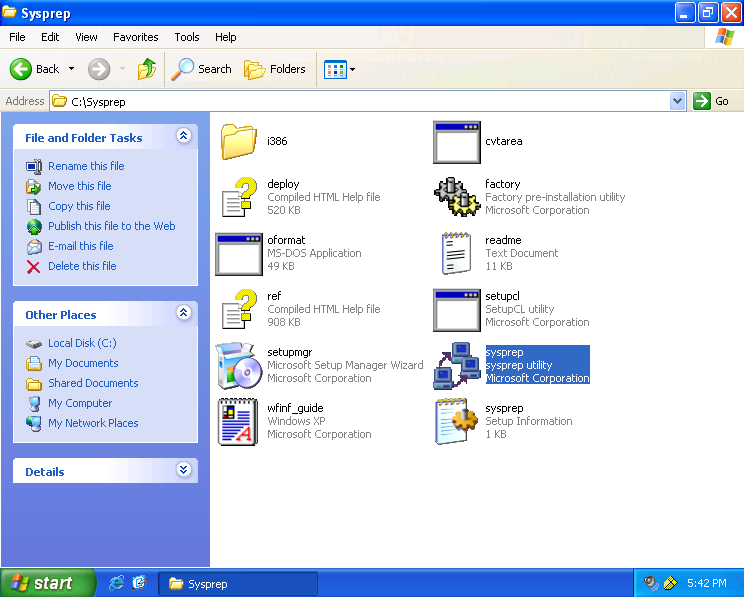
  19. Next, let’s prepare this computer as a sample computer for cloning by run Sysprep.exe.
    Run Sysprep Preparation Tool 2.0
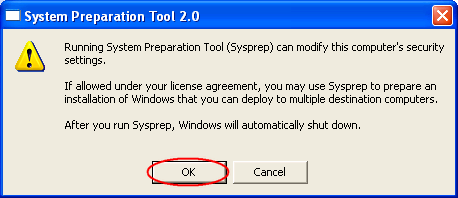
  20. It shows a warning message. Just click OK.
    Sysprep Preparation Tool 2.0
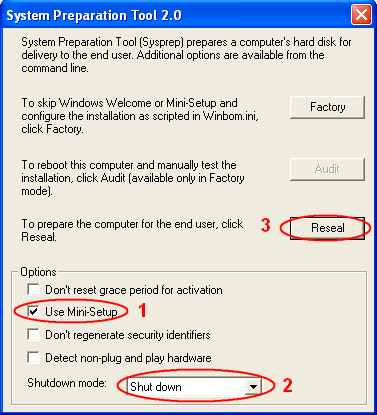
  21. To make Sysprep use Answer file after cloned, check on Mini-Setup. Select Shutdown mode to Shutdown. Click Reseal.
    Reseal
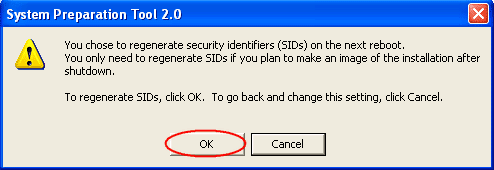
  22. It shows a warning message again that after reboot the security identifiers (SIDs) will be regenerate. This is what we want after clone the disk. Click OK.
    Warning regenerate SIDs
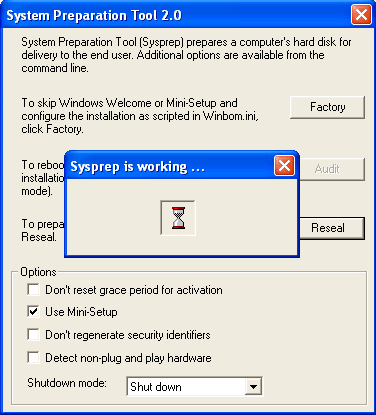
  23. Sysprep is working.
    Sysprep is working
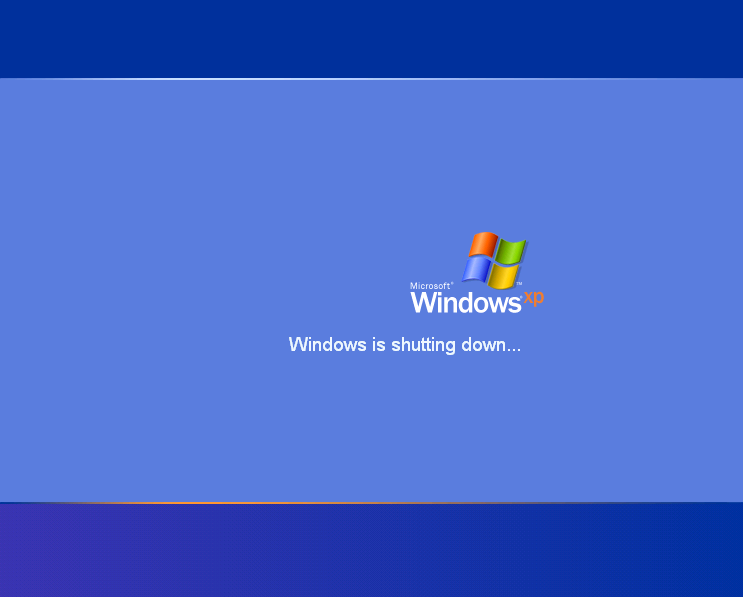
  24. The sample computer is shutting down. After the system shutdown, its disk can now be cloned to other disk now. Next post, I’ll show how to clone a disk to disk using Norton Ghost.
    Exit Setup Manager

Creat XP ghost image working on all computers

Posted by Faheem Qureshi | 12:15 PM | | 0 comments »

Hi all
i found a very nice program that has english GUI and makes syspreping
(then ghosting) of windows XP very easy and automatic.and the result works with
almost all kind of mainboards.

Needs:
--------
System Preparation Assisted Tool:At his time Spat6.0.0beta2 can be downloaded
from link below (9.83MB):
http://www.mediafire.com/?zumzhnmmljg

SkyDriver : At this Time SkyDriver 9.9 can be downloaded from links below:

http://gostep.info/skydriverxp-v9-9-bo-driver-moi-nhat-cho-dan-lam-ghost-auto-driver.html

=================================================================

1.This tutor will work just for drive C: ,So Install your favorite Windows XP
(sp2 or sp3) in drive C: (No different if you install or not install your
system drivers).

2.Istall all your favorite programs like Office,FireFox,7zip, and ... and test
them to be sure they are working.

3.Install any windows updates that you need.

4.Make all your favorite customizations in your system.

5.Delete all unneeded files like files in temp folder and ...then Empty Recycle bine.

6.Extract Spat6.0.0beta2.exe some where forexample your desktop.

7.Extract SkyDriver to C:\Sysprep directory.

8.Make your favorite Back ground picture (800x600 0r 1024x768 24bit JPG) ,Name it
setup.jpg and put it in C:\Sysprep\ directory. This is the background picture that
you will see after applying the final ghost image to any computer,during first Boot.
(See pic_01.jpg from attachment).

9.You can put more files inside C:\Sysprep\ directory like directx and ...that will
be run during 1st boot (If you give the assosiated commands that i will tell about
them during tutor) and will be added to your installed system automatically.

10.Run Spat6.0.0beta2.exe,If every thing is ready to begin,it will show message ,OK it.

11.The main page of Spat6 will be shown (See pic_02-A).Do as below:

_ A _ Go to general tab select all.

_ B _ click on "background picture" ,Then select C:\Sysprep\setup.jpg ,then click
preview to show your picture ,then OK.

_ C _ Go to Interface tab and in "Run before mini-setup" section give infor mation
below (as you see in pic_02-:):
C:\Sysprep\DrvS3.exe
Note: as i told in step 9 you can put other tools in C:\Sysprep\ directory
that as you see in pic_02-B,i have typed commands for thee other programs to
be integrated to our deployed system and will be run during mini setup.but
for this tutor you do not need them.

_ D _ Go to Reseal tab select your favorites.

_ E _ Back to General tab and click on sysprep

12.Spat starts working (About 1 or 2 minutes) then when the job is finished,it's
window will be closed.wait about 1 minute,then shut Down computer.

13.At this time your C: drive is ready to get ghost image of that.So Boot your
computer by 3rd party,get ghost image of drive C: and put it some where for
example in D:\My Ghost\

Now every thing are finished,and if you apply this ghost image to drive C: of
any computer,in 1st boot you will have mini setup proccess (about 10 minutes)
and when it is finished ,you will see that it works in all computers and also
all or some of drivers of that computer is installed automatically.This is because
we have used SkyDriver that has many of drivers inside itself in 7zip format (the
size of 7ziped drivers is 161 MB and extracted drivers are about 1.07 GB).

Now If you boot your computer normally,you will have 10 minutes of mini setup
proccess,then you can use you ready windows.this is the same proccess that you
will have if you apply ghost image to another computer.The only difference is
this that in some computers you will not need to install drivers and in some
else you may need to install one or more drivers


I tested this project with 7 different computers by different hardwares all was OK.
==================================================

hope will be some help

Note that spat 6 is password protected and password is:
gostep.info


Need for Speed Underground 2 will challenge gamers to immerse themselves in the tuner culture, exploring an expansive, free-roaming city divided into five distinct neighborhoods. Gamers will encounter rival racers who will initiate events, tip players off to the hottest racing spots, and show them where to buy the most sought-after licensed aftermarket upgrades. The game will feature new game modes, deep new performance customization and tuning, and more than 30 licensed cars. The game also delivers twice the visual customization upgrades as the original game, providing a staggering 70 billion possible car combinations for total automotive self-expression.


Photo Recovery 2012 v3.1a Software

Posted by Faheem Qureshi | 10:15 AM | | 0 comments »


With an easy-to-use interface and a powerful photo recovery engine that can recover even the most highly-fragmented photos, Adroit takes photo recovery to a whole new level. Adroit Photo Recovery is an easy-to-use application whcih can recover deleted photos from internal and external hard drives, USB sticks, memory cards, digital cameras, and disk images in three easy steps.

Simply point and click the drive or memory card to recover from and Adroit takes care of the rest. During recovery thumbnails of recovered photos stream through the screen. When recovery is complete Adroit groups the photos for easy navigation. Thumbnails and full preview of recovered images are also available.

Here are some key features of "Adroit Photo Recovery":

· Recover from any device
Adroit can recover photos from any device, so long as it is readable. These include:
· Internal and external hard drives
· USB sticks
· CompactFlash cards
· SD cards
· Digital cameras
· CD-ROMs
· Recover heavily fragmented photos
· A heavily used memory card or drive "fragments" photos during storage. Adroit excels at recovering fragmented photos. It can even recover fragmented photos from a formatted drive or memory card! Even the most expensive data recovery services cannot accomplish this unique featRecover from any file system
Adroit supports most common file systems used on memory cards and by Microsoft Windows, such as:
· FAT12
· FAT16
· FAT32
· NTFS
· It can also run in a file system-agnostic mode to recover photos stored on any other file system.Recover most common formats
Adroit recovers most common file formats in which photos are stored in:
· JPEG
· PNG
· Canon RAW CR2
· Canon RAW CRW
· Nikon RAW Format
· Automatic (re)format detection
· Adroit automatically detects whether loss of photos was due to re-formating of a drive and tunes its recovery engine accordingly to recover photos from the formatted drive.The user interface guides you through the entire recovery process in just three clicks.
· Choose the drive/other device to recover photos from.
· Click "Recover My Photos" & watch the recovery unfold.
· Click "Save All" or flip through individual photos to save.

Installation :-


1. Unpack
2. Install
3. Copy crack in installation directory
4. Enjoy it !!!!!!!


Xilisoft Video Converter Ultimate can convert between almost all video and audio formats including AVI, MPEG, WMV, DivX, MP3, WAV, even HD videos. It supports various preset profiles for iPod, PSP, and other digital devices. It even supports outputting lossless audio format FLAC, WAV lossless audio, WMA lossless audio.

Features of Xilisoft Video Converter Ultimate:-


· Offer powerful video effects editing functions, including crop video size, edit video effects, add and adjust video subtitle, and add video watermark;
· Clip any video or audio segment to convert, and merge them into one;
· Allow to convert one source file to several, or merge several source files into one;
· Can preview and compare source video and video customized;
· The snapshot provides you with image snapping, and also you can grab picture by setting the duration.
· Provides rich profiles for you to choose, and enables you to customize and save your profile for future use;
· Can customize the size of output audio and video file for different devices;
· Provides batch conversion and multithreading to convert multiple files at the same time;
· Can run in background for more efficiency

Title: Xilisoft Video Converter
Version: Ultimate 6.0.4.0617
Developer: Xilisoft Corporation
Homepage: xilisoft.de
Updated: 2010.06
License / Price: 44,95EUR(patch)
Language: Multilanguage
Platform: Windows 2K/XP/2K3/Vista/7
Size: 29.1 mb

Installation :-


1. Unpack
2. install
3. Use Serial Key or Copy Crack in Install Directory "C:\Program Files\Xilisoft\Video Converter Ultimate 6".
4. Enjoy it !!!!!!!!!!!


Search Engine Optimization Secrets

Posted by Faheem Qureshi | 7:55 AM | | 0 comments »


SEO Secrets

Some of the contents of Book...

01: Understanding Search Engine Optimization
02: Relearning How You See the Web
03: Picking the Right SEO Tools
04: Finding SEO Problems
05: Solving SEO Problems
06: SEO Best Practices
07: The SEO Consulting Process
08: Comprehensive Site Audit(Informational Website)
09: Comprehensive Site Audit (E-Commerce Website)
10: Understanding the SEO Industry
11: Search Engine Verticals
12: Optimizing for Alternative Search Engines
13: Test, Test, Test, and more...

Book Name:   Search Engine Optimization Secrets
Author:   Danny Dover
Language:   English
Pages:   537
File Type:   WinRAR Archive (Please unzip it to read Book)
File Size:   8.31 MB


Internet download manager is one of the most popular and the best download manager tool. Most of we prefer IDM for our downloading purpose because of it’s awesome features. But this useful application is not free, we have to pay and buy this application. It comes with 1 month trial period and after the validity ends you have to buy this application. Most of we use patches and cracked version of IDM, but we don’t think that most of the patches or cracked software may contain virus. So here I will describe you how to crack IDM manually so that you will be safe from possible virus attack and also you will get lifetime validity on your IDM. When we update IDM it shows that IDM is registered with fake serial number but IDM exists, then it will stop downloading. By using this trick your IDM is registered for life time and you will not get any error while updating next time.


STEP 1. Go to this file location C:\WINDOWS\system32\drivers\etc

STEP 2. Now we will edit hosts file . Open hosts file in notepad

STEP 3. In notepad you have to copy and paste some data


127.0.0.1 registeridm.com
127.0.0.1 www.registeridm.com
127.0.0.1 www.internetdownloadmanager.com
127.0.0.1 internetdownloadmanager.com
127.0.0.1 www.tonec.com
127.0.0.1 tonec.com

STEP 4. Save the hosts file .

STEP 5. Register using serial


412AU-F6BI4-F4AKG-CO6Z8
HRZ5L-G96GN-6BYJF-Y9G3R
Z4CVO-F0LUG-T4KEL-388MY
412AU-F6BI4-F4AKG-CO6Z8


Your IDM is now converted into full version. It will now works 100%. You do not need to register again or patch after you update your IDM again